
Structural Integration Homework Series
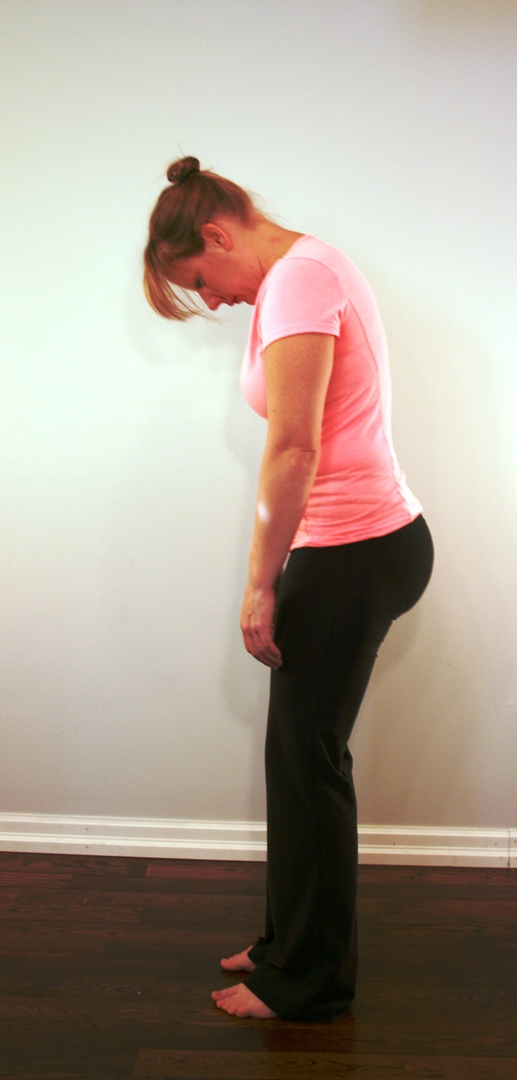
Session 1 - Finding your line
Purpose:
This homework is designed to align your body ideally in the field of gravity. In this alignment postural stresses are significantly reduced or eliminated. By learning to stack your body in this manner you are re-educating your nervous system to this ideal relationship.
How Often:
This exercise is done on an ongoing basis. Every time you are stopped in a standing position.
Directions:

Align your feet, fist width apart, pointing the second toe straight forward. This creates a solid foundation for your structure. This will correctly align your ankles and knees.
The final step is important to ensure a true and proper line so you are standing from the top of your head.

Slightly tilt your head back,

and in a relaxed fashion, bring your chin to level making sure you stand tall, take a deep breath in and exhale while softening along the spine.

You should feel soft and standing without any effort to keep you in that space.
Smile! You are in your line!
Session 2 - Toes Up Foot Up: Basic
Purpose:
This homework is designed to re-pattern your feet so they will move and function in the correct planes of movement during walking and running.
How Often:
This exercise should be done at least 3 times per week. The best time to do this re-patterning is before a walk or a run, but can be done any time.
Directions:
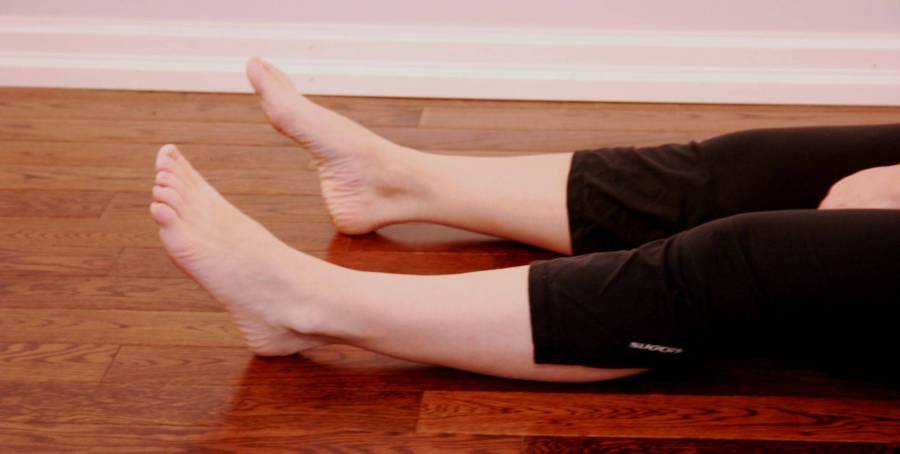
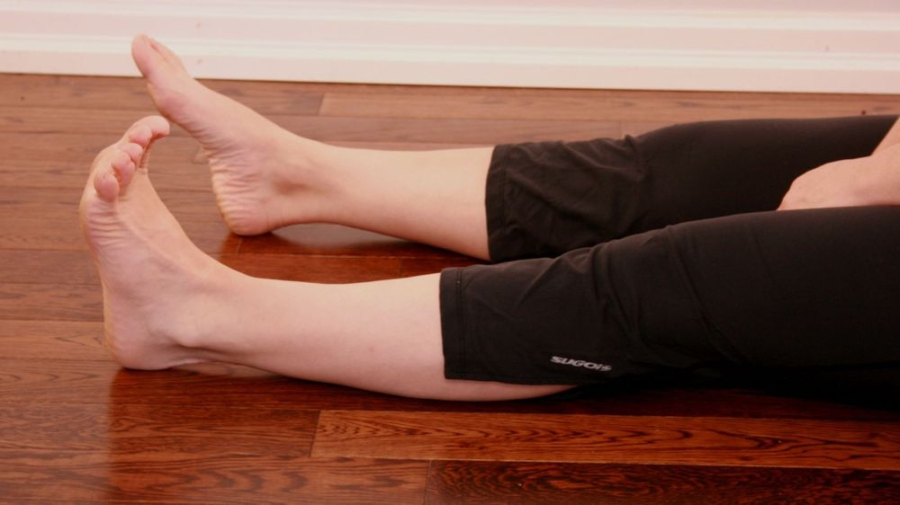
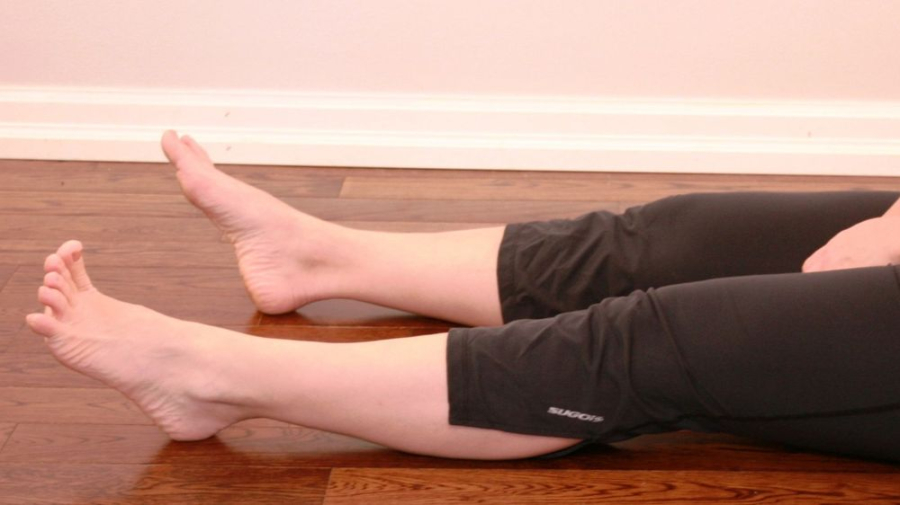
Sit on the floor with your low back as close to the couch, chair, or wall as possible to allow a lengthened spine. You can also lean back on your palms to lengthen the spine.
Align your legs and feet in front of you as if you are standing in your line. Work on one leg at a time, moving the non-working
leg off to the side.
In this position, bring the toes up towards your nose -
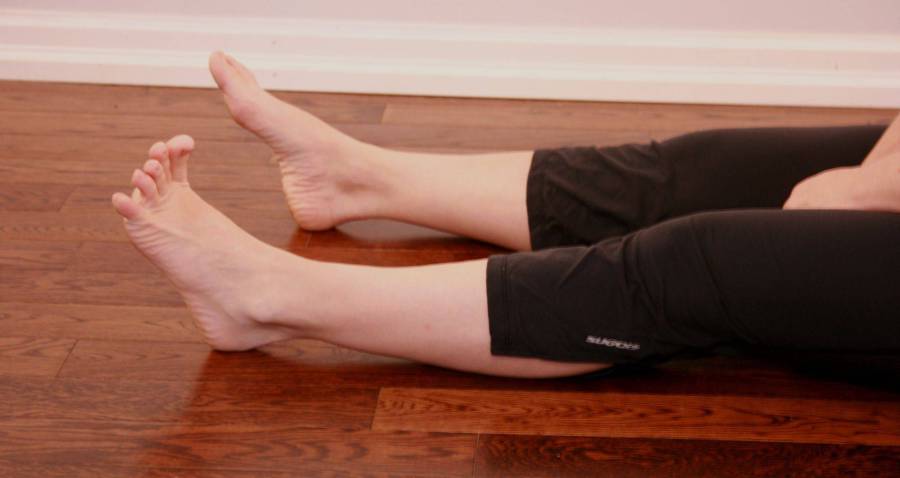
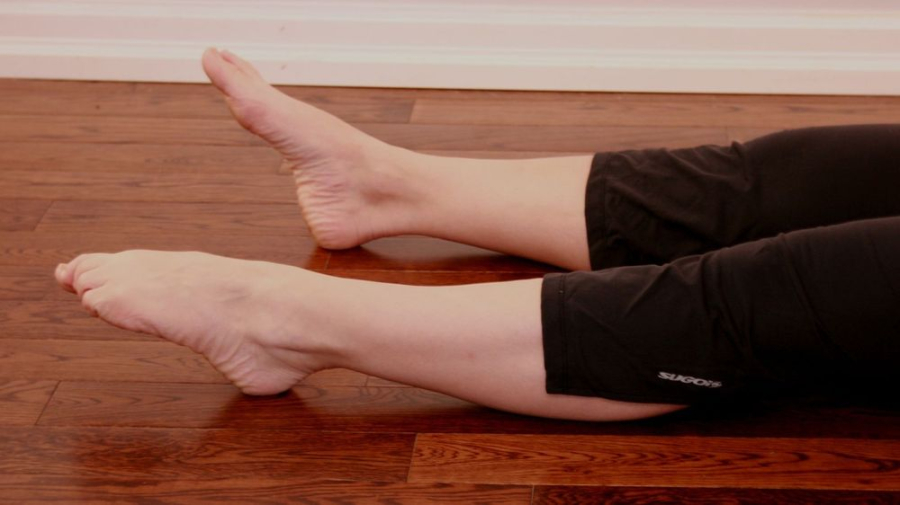
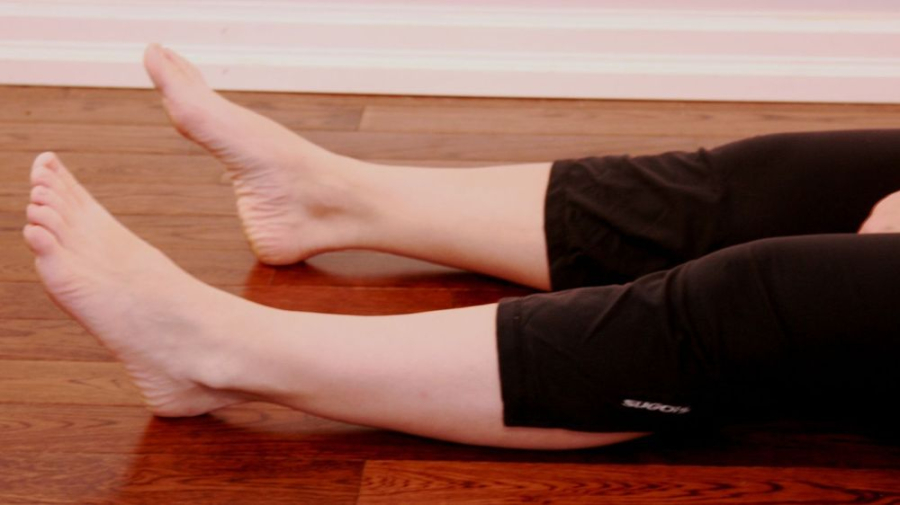
Then flex your foot up -
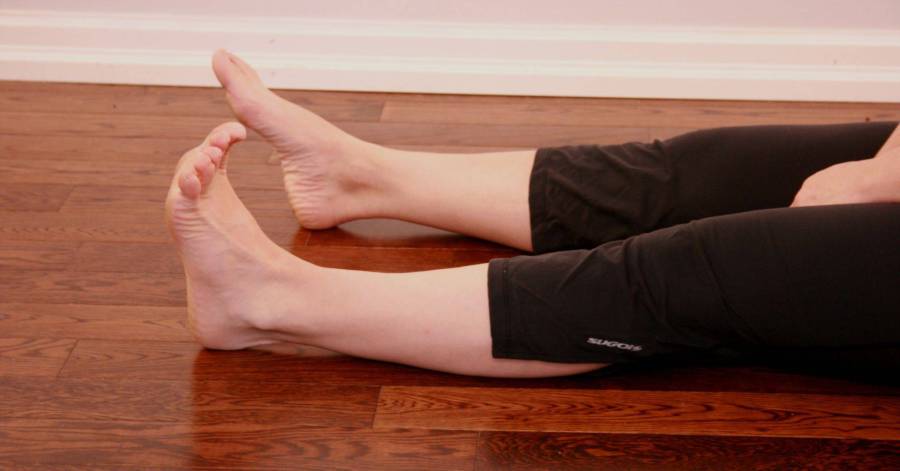
bring your foot down with the toes still up -

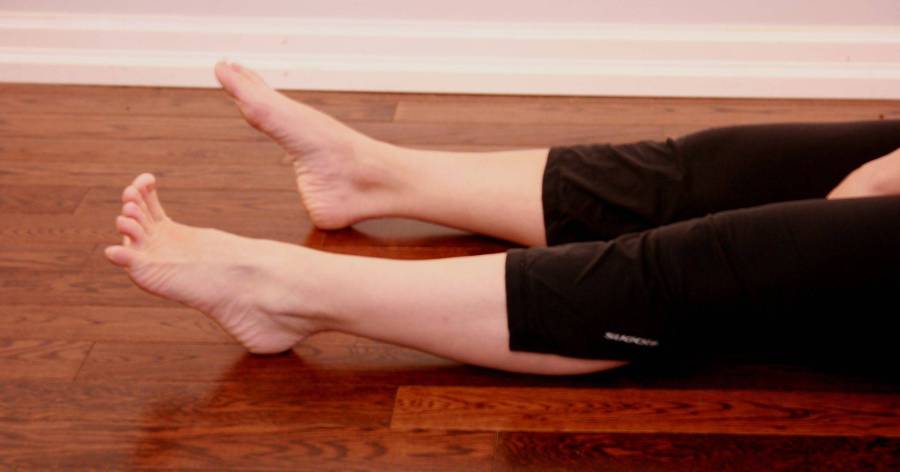
then point the toes down and soften your foot. Start again with toes up, repeating the pattern.
Toes up, Pause, Foot up, Pause, Foot Down, Pause, Toes Down, Soft. Repeat this 10 times.
Switch legs and repeat.
Do 3 sets of 10 for each leg.
If this is too much and causes strain, reduce to two sests of 10 each or even 1 set of 10 until you feel stronger.
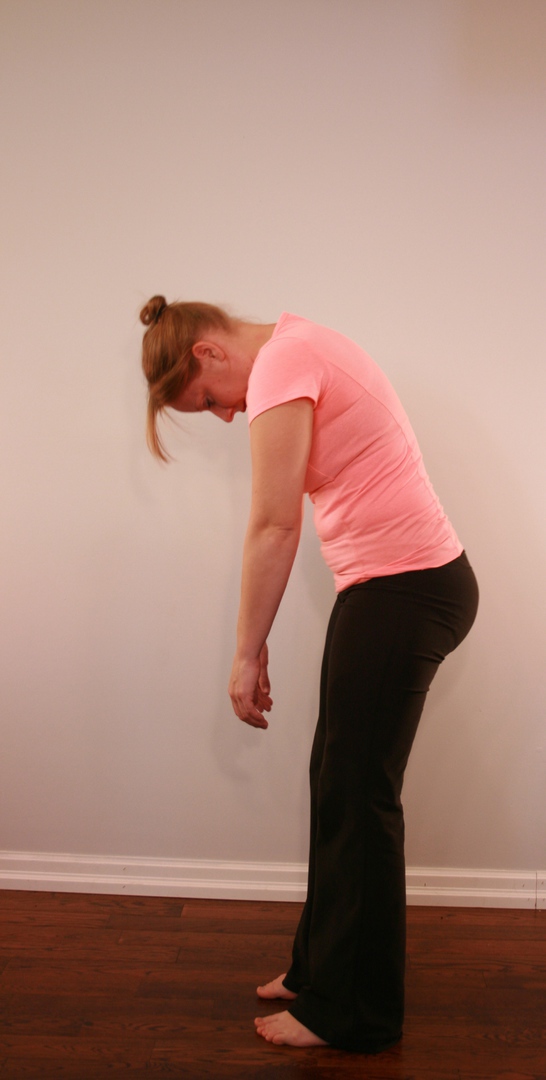
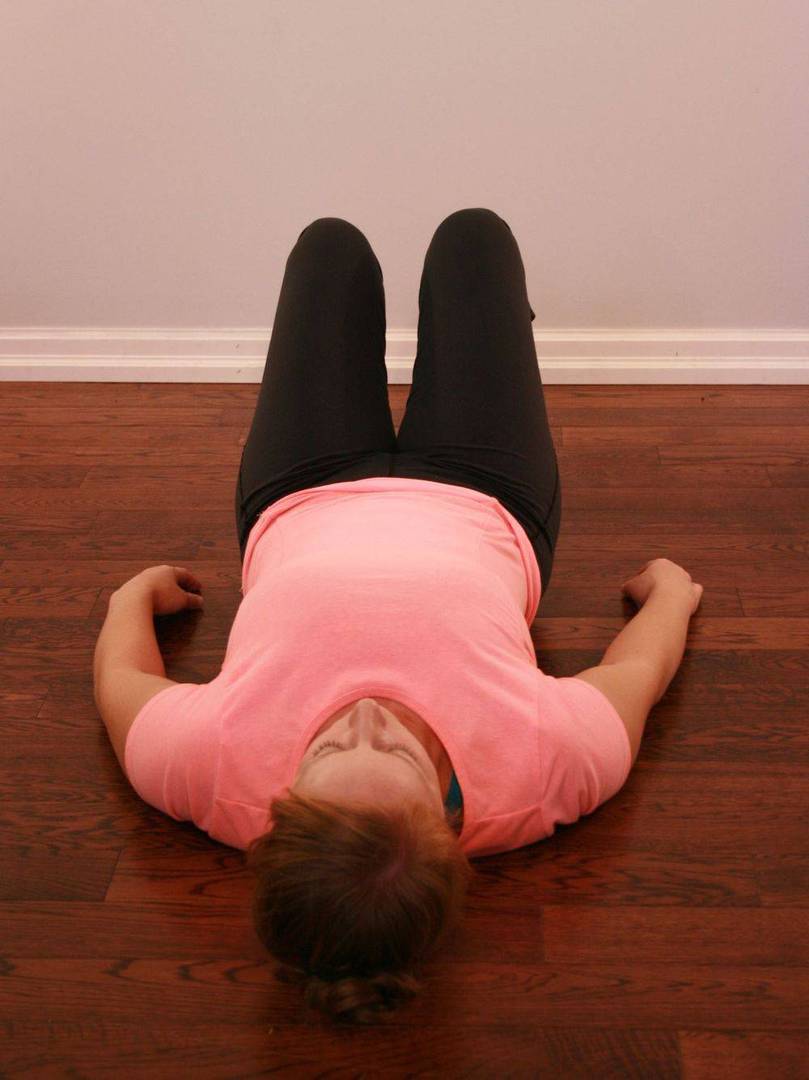
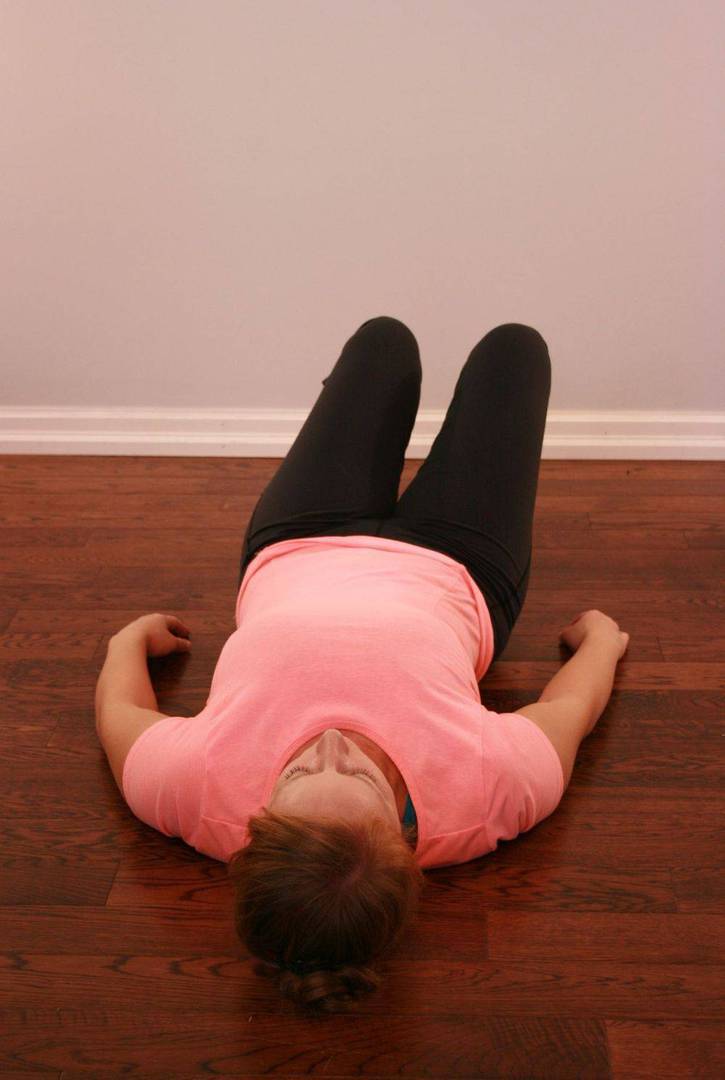
Session 3 - Rolling the Spine
Purpose:
This homework is designed to re-pattern the spine. It will help to re-position the vertebrae in the correct alignment. This is a great exercise to do in the
shower. The hot water will help warm the tissue surrounding the spine and may make it easier. It is
also good to do when you are having any kind of spine stiffness or aches.
How Often:
This exercise should be done at least 3 times per week.
Directions: Basic
Stand in your line with your knees slightly bent - start by rolling your chin to your chest and continue to roll (imagine clicking over one vertebrae at a time)
as far down as your body allow you to go without pain - make sure your arms are hanging softly as you go (rag doll) then slowly while breathing soft and calm, come back up from the bottom of the spine clicking one vertebrae at a time back up till you stand back in your line.
Repeat for at least 5 reps, more if you are able.
Modifications:
If You are unstable on your feet or get dizzy do this in a seated
position focusing on your spine and not keeping the legs in line.
Repeat for at least 5 reps, more if you are
able.
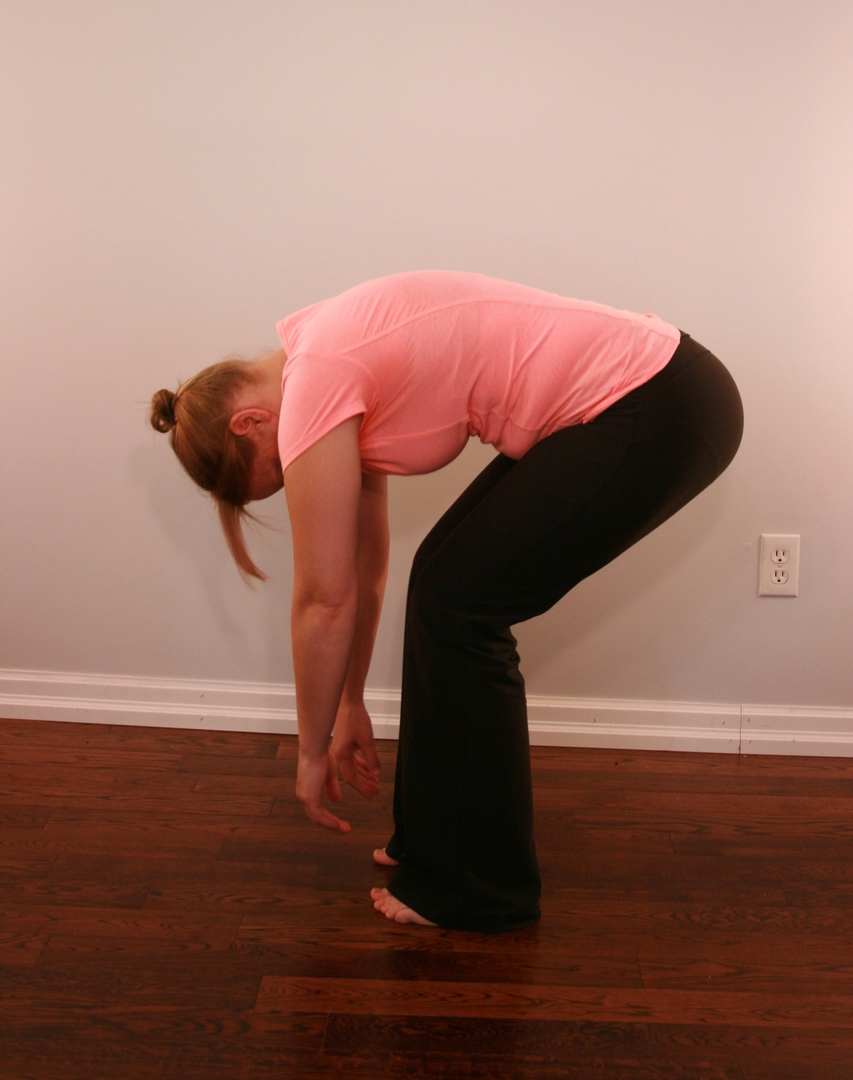
Advanced:
As long as you have no injuries and decent flexibility, you will
start
in a crouched position with the backs of your hands on the floor,
palms up, toward the ceiling.
Next, slowly raise the pelvis imagining a hook lifting your pelvis
straight up. Make sure your head is hanging down the entire time.
Next, you will slowly begin to raise your spine by stacking each
vertebrae, one at a time, one on top of the next.
Make sure the entire time your head and arms are hanging
completely relaxed.
Once at the top you will reverse the entire process, unstack each
vertebrae as slowly as you came up until you are all the way back
down to a crouched position again.
Reset and begin again.
Repeat for at least 5 reps, more if you are able.
Session 4 - Advanced Toes Up, Foot Up
Purpose:
The advanced version adds the motion of the knee to further train the
muscles in the correct walking pattern
How Often:
This homework should be done at least 3 times per week. The best time to do this re-patterning is
before a walk or a run, but can be done at any time.

Knee Forward

Toes Up

Foot Up
Knee Back
Toes Down
Foot Down
Soft
Directions:
Sit on the floor with your low back as close to the couch, chair, or wall as possible to allow a lengthened spine. You can also lean back on your palms to lengthen the spine.
Align your legs and feet in front of you as if you standing in your line.
Work on one leg at a time, moving the non working leg off to the side.
Raise your knee forward towards the ceiling (allowing your foot to slide toward you slightly) until your knee is an inch or two off the floor. Then continue with "Toes up", Pause, "Foot up", Pause, Then let your knee back down to the floor and finish with "Foot Down", Pause, "Toes Down", Pause. SOFT
Repeat this cycle 10 times.
Switch legs and
repeat.
Do 3 sets of 10 for each leg.
Session 5 - Basic Pelvic Clock
Purpose:
This homework develops organized movement in the pelvis. It helps to
create movement within the pelvis, especially within the SI joints.
How
Often:
To achieve maximum results this homework should be done a minimum
of 3 times a week for approx. 5 minutes at a time. This homework can be done as often as
needed to alleviate aches or pains.
Directions:
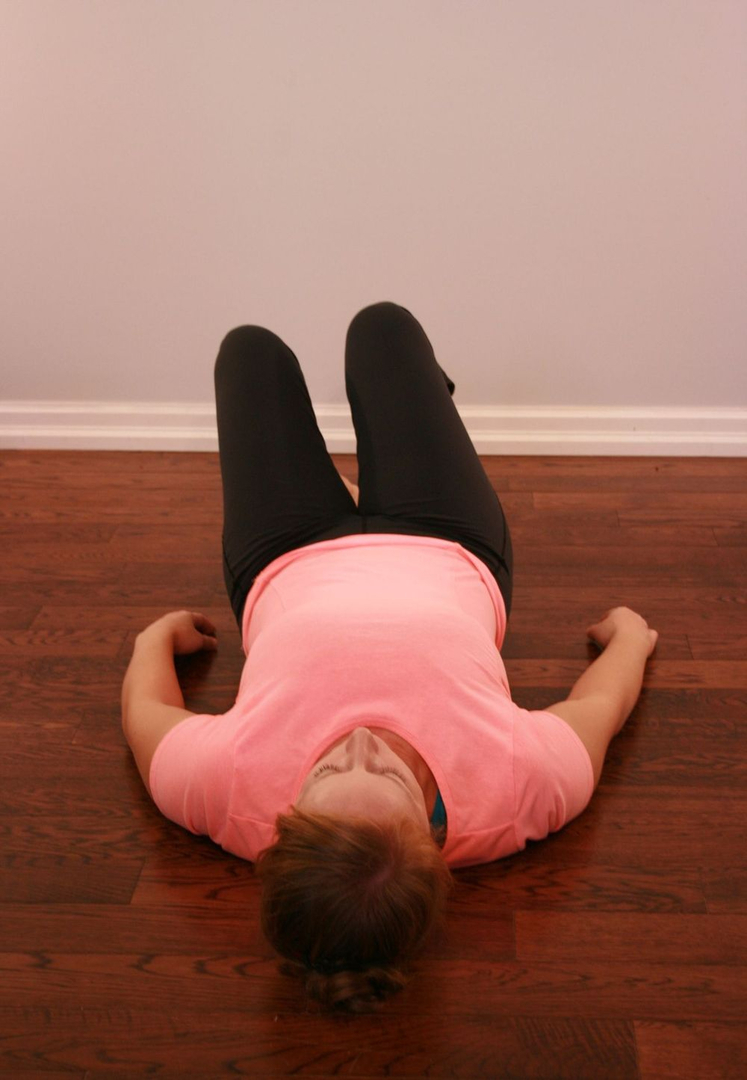
Laying on the floor on a comfortable but firm surface (yoga mat, carpet)
start in a neutral position. Neutral is face up, knees up and feet flat. This assures a long relaxed spinal position.
Imagine you are a clock on the wall. Your left side is 3 o'clock, your right side is 9 o'clock, your feet are 6 o'clock and your head is 12 o'clock.
Basic Pelvic
Clock
Start at 3 o'clock, allow your knees to go over to your left side at a 45
degree angle. Back to center. Then allow your knees to go over to your right side at a 45 degree angle, for 9 o'clock. Perform this motion 5-6 times.
Next, for 12 o'clock roll your pelvis up by flattening your lower back on the floor. (Feels like you want to slide on your back but in stead just let the pelvis roll up) To find 6 o'clock roll your pelvis down slightly.
ALWAYS END WITH 12 O' CLOCK AND SOFTEN DOWN,
IT KEEPS THE SPINE LONG.
Perform this motion 5-6 times.
The key to this homework is to keep your abdominal muscles soft. This motion is initiated from the muscles within
the pelvis.
PRECAUTIONS: Do not do this exercise if it creates any
kind of pain. Do not do this exercise if you are pregnant.

Neutral
9 O'Clock
Neutral
3 O'Clock

Neutral

6 O'Clock

12 O'Clock
Session 6 - Intermediate Pelvic Clock
Purpose:
This homework develops organized movement in the pelvis. It helps to
create movement within the pelvis, especially within the SI joints.
How
Often:
To achieve maximum results this homework should be done a minimum of 3 times a week for approx. 5 minutes at a time. This homework can be done as often as needed to alleviate aches or pains.
Directions:
Laying on the floor on a comfortable but firm surface (yoga mat, carpet) start in a neutral position. Neutral is face up, knees up and feet flat. This assures a long relaxed spinal position.
Imagine you are a clock on the wall. Your left side is 3 o'clock, your right side is 9 o'clock, your feet are 6 o'clock and your head is 12 o'clock.
Perform this motion 5-6 times.
The key to this homework is to keep your abdominal muscles soft. This motion is initiated from the muscles within the
pelvis.
Once you are used to the quarter number movements on the clock you will
progress to the next phase.
Warm up with the Basic Clock first.
Direction:
Now you will roll your pelvis in a clockwise and counterclockwise
motions around the numbers of the clock, beginning at 12 o'clock. You can use the quarter
numbers to gauge where you are as you perform this movement.
Again it is important to keep your abdominal muscles relaxed.
Notice the numbers that are more challenging and which are easier.
The harder areas are the ones that need more focus.
ALWAYS END WITH 12 O' CLOCK AND SOFTEN DOWN IT
KEEPS THE SPINE LONG.
Perform this motion 5-6 times.
The key to this homework is to keep your abdominal muscles soft. This motion is initiated from the muscles within the
pelvis.
PRECAUTIONS: Do not do this exercise if it creates any kind of pain. Do not do this
exercise if you are pregnant.
Session 7 - Chewing
Purpose:
You want to introduce chewing on both sides of the mouth for balance in the jaw
Directions:
Start with chewing your food on the dominant side a few times then move over to the non-dominant side and chew for a bit
Repeat that a few times before swallowing
Caution:
If you have pain in the teeth or other problems that won't allow you to do this please do not do this homework
Note:
Please refrain from eating any hard nuts or candies for the first few days to avoid straining the jaw muscles
Session 8 - Advanced Pelvic Clock
Purpose:
This homework develops organized movement in the pelvis. It helps to create movement within the pelvis, especially within the SI joints.
Now that you have increased motion in your pelvis the next phase is to move in diagonal motions.
How
Often:
To achieve maximum results this homework should be done a minimum
of 3 times a week for approx. 5 minutes at a time. This homework can be done as often as
needed to alleviate aches or pains.
Directions:
Laying on the floor on a comfortable but firm surface (yoga mat, carpet)
start in a neutral position. Neutral is face-up, knees up and feet flat. This assures a long relaxed spinal position.
Imagine you are a clock on the wall. Your left side is 3 o'clock, your right side is 9 o'clock, your feet are 6 o'clock and your head is 12 o'clock.
Always warm up with the Basic and Intermediate clock before beginning this
phase.
Working across the clock 1/7, 2/8, 4/10, 5/11 and then the reverse motion. Once you have performed these movements, cool down with the Basic Clock
ALWAYS END WITH 12 O' CLOCK AND SOFTEN DOWN IT
KEEPS THE SPINE LONG.
Perform this motion 5-6 times.
The key to this homework is to keep your abdominal muscles soft. This motion is initiated from the muscles within the
pelvis.
PRECAUTIONS: Do not do this exercise if it creates any
kind of pain. Do not do this exercise if you are pregnant.
Session 9 - Rhomboid Re-patterning
Purpose:
This homework is designed to re-establish strength and integrity in the posterior shoulder girdle. The anterior compartment tendsto overpower the posterior muscles.
How
Often:
This homework should be done 3 times a week for 3 sets of
5.
Directions:
Standing with feet slightly staggered, bring your arms out to your side
with your palms facing forward. Next, engage your shoulder blades by squeezing them together. As you keep the shoulder blades engaged, slowly bring your hands together in front inch by
inch.
Then reverse the motion back to arms out at your side. It is important to keep the shoulder blades engaged at all times. If you feel your shoulder blades wants to separate, move your arms back
an inch, engage the shoulder blades and continue forward again.
Be sure to keep your neck relaxed and shoulders down so your body mechanics are not compromised. If this causes pain, stop!
Rhomboid Variation
Purpose:
This home care is designed to re-establish strength and integrity in the posterior shoulder girdle. The anterior compartment tends to overpower the posterior muscles.
How Often:
This home care should be done 3 times a week 10 circles forward and 10 circles backwards in all three positions
Directions:
Standing with feet slightly staggered or sitting, bring your arms out to your side with your palms facing forward, engage your shoulder blades by squeezing them together. As you keep the shoulder blades engaged, slowly make small circles with your arms with thumbs pointing up.
Then reverse the motion of the arms.
It is important to keep the shoulder blades engaged at all times. If you
feel your shoulder blades separate, take a break, deep breath and start again where you left off.
Do the same movements with the thumbs pointing forward and down
Be sure to keep your neck relaxed and shoulders down so your body
mechanics are not compromised. If this causes pain, discontinue.
Contact Us
Living Balance Clinic
Unit 2 - 551 Knights Hill Road
Lower Level
London, Ontario
N6J 3A1
Phone: 519-601-6602
Email: mail@livingbalanceclinic.ca
Questions?
All the information you need to know for your first appointment will be sent with your first confirmation e-mail when you book online. If you have any other questions or concerns please contact us here or call. Our professional team will be happy to help you.